Thatch Cottage Roofing Turorial


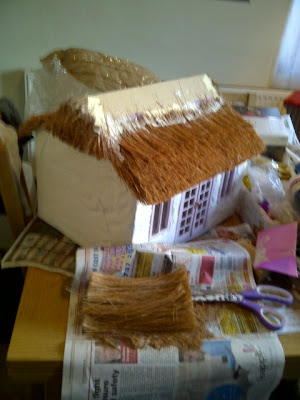


I was asked to do a little tutorial on thatching a miniature cottage so here goes...

To thatch a roof you will need:
Coconut fibre (about two bundles were used on my little
thatch cottage so if it’s a big job you will need a lot!)
2-3 large tubes of Calk or Clear sealant (the sort used
for bathrooms etc)
String
Thick card
I believe there is a degree of personal judgment required
so during this process step back often and take a look and use your personal
judgment, perhaps you need less space between the rows of thatch or maybe they
should be closer together, do you feel they should be thicker or thinner etc,
it’s really up to you so have fun and enjoy the process.
Firstly, make sure that any roof decoration/alteration/painting
around the edges etc is complete and dry before you begin.
Mark a line from
one side of the roof to the other, around 6cm from the lower edge of your roof
as a guide then cut some coconut fibre into 10cm (aprox) strips.
Generously spread some sealant or calk onto your roof
(aprox 6cm square).
Tip: I use both calk and sealant, the sealant does not
dry ‘bouncy’ like it would around a bath, it also stretches a little more and
dries clear so that you can’t see it through or on the thatch so it’s great for
finishing off the top layer.
Push/slide a thin layer (aprox 0.5cm thick, 3-4cm wide)
of coconut fibre upwards from the base of your roof into the sealant/calk and leave
a large overhang of 4cm and press down.
Tip: this is a messy job so it’s a good idea to wear a
pair of thin latex gloves, if not have an old flannel/face cloth in a bowl of
water close buy so you can clean your fingers regularly.
Continue filling up the bottom layer in the same way.

The second layer should sit around 2cm up from the first
layer; again mark a line from the top of the first layer 2cm up. Spread a generous layer of calk or sealant
and overlap it onto the previous layer leaving the bottom 3/4 free from any
sealant. Again push or slide a section
of the pre-cut (10cm) coconut fibre into the sealant and onto the roof.
Continue until you have completed a full row. Then repeat this whole process on both sides
of the roof until you have approximately 4cm left of roof to cover.


This is where the artistic bit starts.
Take a piece of card 8 cm wide x the length of your
roof. Fold the card in half length ways
so you have two sections 4cm x roof length and set aside.
Take a small bunch of coconut fibre and the string, bend
the coconut fibre in half and tie tightly with string, do this with several
bunches, enough to cover the top of your roof.
Wet the coconut fibre bunches and then hang up to dry.
Take the card and spread some sealant down one side. Next press a thin line of coconut fibre
(aprox 0.5cm) onto the sealant being sure not to overlap the fold line. Do the same on the other side, be sure there
is no sealant showing through and cover with a piece of paper. Stack some heavy books on top to weight it
down and leave overnight.
When you return to the thatched card lift the books and
paper and leave it to sit for a little longer, before going any further be sure
that it is fully dry.
Take another piece of card and make a template for your
pattern. Place the pattern onto the
thatched card and using some sharp scissors cut the shape into the card and
thatch on both sides.
Tip: to help you gain the shape you want you may have to
cut the basic shape, step back and take a look from a far then gently trim any
straggly strands a few at a time like clipping a hedge until the desired effect
is achieved.
Trim a straight line around the base of the roof, I like
to leave a wide overhang but use your judgment here.
Next you will need to trim the thatch on your roof. It’s much like a haircut, using sharp
scissors aim the length of the scissors upward towards the top of the roof and
cut upwards only on a sort of diagonal. In
this way you will avoid cutting chunks out of your new roof and it will achieve
a much smoother finish.
Tip: if the thatch is sticking up to much or moving as
you try to cut it. Place your hand on top and press down gently to hold it firm
while you cut.
Tip: if you do end up with a couple of gaps or chunks missing, cut some thatching quite small, cover the end with sealant, open up the hole and slid the thatch into place, leave to dry and trim later.


Now cover the top of your roof with a thin layer of calk,
place the dry, folded card on top and press down firmly and hold. If possible
apply a small amount of pressure in the form of a clip or something to hold it
in place for a few hours.
When the roof is set, take the bent bunches of coconut
fibre and stick a thin layer over the very top of the roof (and thatched
card). Once these are stuck in place
trim to match the pattern you have already cut out. Repeat this until you can
no longer see any card and the top of the roof is completely covered.
Lastly take the string and glue it with PVA glue into a
pattern to finish off the roof and make it look more authentic.


Love this! Where did you find the coconut fiber in straight bundles like that? Can I purchase some directly from you? I've always wanted to try making a thatched roof like this for my daughers doll cottage.
ReplyDeleteYou can get it on ebay
DeleteThat is adorable. Just love the thatched roof!
ReplyDeleteYea, where the heck did you find that fiber??
ReplyDeleteTry bird suppliers. They sell it in bundles of straight fibers for birds to pick out.
DeleteYou can get it on ebay fairly easily... it is coconut fibre. :)
ReplyDeleteCan you tell me where you buy the conconut coir? I brought some on ebay but it is not like yours (straight and ready to glue)
ReplyDeleteShow-fantastico
ReplyDeleteWill the roof be suitable for outdoor use ? My son wants to build a round house style bug hotel and he wants a thatched roof !!
ReplyDeleteThis is a bit of a roundabout approach, but it was readily available; I bought a janitorial broom (the kind that comes separate from its screw
ReplyDelete-in handle), and by using pliers and profanity soon had all the fiber I needed. Just a suggestion...
,
ReplyDeleteThis is a very nice post . I have visited the site many times and learn about Synthetic Thatch very nicely.
We are the Largest Supplier of No. 1 Quality Synthetic Thatch Roofing Material and Artificial Bamboo products supplying top-quality Synthetic thatch & Artificial Bamboo products with 20 Year Warranty, UV-proof, Class A flame-retardant, Maintenance-free. You’ll be astonished at how well our Synthetic Thatch Roofings withstand ocean breeze, heavy rain, snow storm, intense sunlight and general wear & tear for more than 20 years while still looking amazing.
I have found so many interesting thing in your blog and I really love that. Roof contractor west palm beach Keep up the good work!
ReplyDeleteGreat read! Synthetic thatch roofing is such a smart solution for anyone wanting the natural, tropical look without the high maintenance of real thatch Synthetic Thatch Roof | Outdoor Umbrella | monsoon blinds | Synthetic Thatch Roof | pvc blinds | wooden venetian blinds | roller blinds for windows
ReplyDeleteThis is really nice information you posted, It's very informative and definitely, will be helpful for those who are looking for roof painting. To know more about visit roof painting ashwood
ReplyDeleteWeather exposure is something many homeowners underestimate. Roof coatings and proper repairs can help prevent long-term damage. I learned more about this from Phoenix roof maintenance specialists.
ReplyDeleteThis comment has been removed by the author.
ReplyDelete